


Convert QuickBooks Desktop to Online

It is time to make the switch to QuickBooks Online if you would like to be able to access your QuickBooks software from any location. Converting QuickBooks Desktop to Online is typically brisk and uncomplicated, and if you run into any problems along the way, you are able to seek assistance from QuickBooks support or a QuickBooks Consultant. You can use this instruction to convert from QuickBooks Desktop Pro or Premier to any version of QuickBooks Online, with the exception of the Self-Employed edition.
When you sign up for QuickBooks Online, if you do not already have an account, you will be given the option to either receive a discount of 50% for three months or a free trial period of 30 days.

Hint: If you want to convert from QuickBooks Desktop to QuickBooks Online, you have sixty days from the day your QuickBooks Online subscription begins. After sixty days have passed, you can create a new QuickBooks Online company and cancel the subscription you are currently using. It is possible to set up one email address to correspond with multiple businesses.
What To Consider Before You Convert QuickBooks Desktop to Online
Even though we ranked QuickBooks Online as the best accounting software for small businesses, QuickBooks Desktop does provide a few significant advantages over QuickBooks Online. These advantages include QuickBooks Desktop is typically speedier for experienced bookkeepers, has more options available for dealing with inventory, and can report expected versus real job costs. Additionally, it has more options available for interacting with customers. Read our article that examines the differences between QuickBooks Online and QuickBooks Desktop if you are unclear about whether or not it would be beneficial for your business to make the transition to QuickBooks Online.
The vast majority of information from QuickBooks Desktop will be immediately transferred to QuickBooks Online, even though some functions Online are referred to by different names and may not function in exactly the same way. QuickBooks offers both a list of features available in the Desktop version as well as a description of how those capabilities will be ported over to the online version.
In this post, we will go through the processes necessary to convert a QuickBooks Desktop file to QuickBooks Online using QuickBooks Desktop Pro, QuickBooks Desktop Premier, or QuickBooks Desktop Accountant. You can convert QuickBooks for Mac by following the instructions provided by Intuit for the QuickBooks Mac conversion. Intuit also provides conversion instructions for QuickBooks Enterprise, which you can get if you use that version of QuickBooks.
In order to migrate data from QuickBooks Desktop to QuickBooks Online, complete these steps:
Check the File Size Requirements
To find out the total target count, open the file for your QuickBooks Desktop application and hit the F2 key. If your file is larger than the maximum of 350K targets, you can attempt to lower the targets by condensing your QuickBooks file and bringing it down to a smaller size. If you are unable to reduce the number of items in a list by condensing them, your only other option is to transfer the lists and forego the conversion (this will be covered in more detail later).

Get the Data from Your QuickBooks Desktop Version Ready to Be Uploaded to QuickBooks Online
It is in your best interest to get your QuickBooks file as up-to-date as possible before converting to QuickBooks Online. This will ensure that your bookkeeping will not fall behind while attempting to become familiar with the new procedures of QuickBooks Online. Before getting started, you need to double-check that your bank accounts have been reconciled, that payroll has been processed, and that inventory has been adjusted.
In addition to this, it is highly recommended that you create a backup copy of your business file in case something unfortunate occurs. You may create a backup of the data file by navigating to the File menu, selecting Back Up Company from the submenu, and then clicking on the Create Local Backup button.

Before switching to QuickBooks Online, it is highly recommended by QuickBooks that your business file be stored on a local device. Restore the backup file that you just made onto your local disk and utilize that file for the QuickBooks Online conversion if you typically access the business file from a network device. You can do this by selecting "Restore" in the "File" menu of the "Backup" window that appears after you click
If You haven't already, create a QuickBooks Online account.
Set up a QuickBooks Online account if you don't currently have one. Before beginning the process of converting, you need to go to QuickBooks Online and subscribe to the version of QuickBooks Online that best suits your needs. Read through the breakdown of the differences between the various versions of QuickBooks Online if you are unsure which one is ideal for your company or speak to a QuickBooks Consultant at PNATC. You have the option of signing up for a free trial as well.
You will need to download the most recent version for QuickBooks Desktop if the "Export Company File to QuickBooks Online" option is not visible to you when you go to use the program. From the Help menu, select Update QuickBooks, and then proceed with the instructions that appear. After the update has been finished, you should export the business file using the instructions given above. In order for the update to take effect in QuickBooks Desktop, it is possible that you will need to exit and then restart the program.
You will need to download the most recent version for QuickBooks Desktop if the "Export Company File to QuickBooks Online" option is not visible to you when you go to use the program. From the Help menu, select Update QuickBooks, and then proceed with the instructions that appear. After the update has been finished, you should export the business file using the instructions given above. In order for the update to take effect in QuickBooks Desktop, it is possible that you will need to exit and then restart the program.
Hint: QuickBooks support is limited to three years and will no longer provide support for desktop programs; as a result, it is possible that you will not be able to update older programs. A free trial subscription to the most recent version of QuickBooks Desktop Pro can be downloaded and used for a period of thirty days without incurring any fees. After opening the file in the new program, you should be able to export it to QuickBooks Online so that you can continue working with it there.
Using the desktop version of QuickBooks, log in to your online account.
After you have chosen the information that you wish to send to QuickBooks Online, the QuickBooks Desktop application will inquire as to whether you wish to continue with the migration of your file or if you would first like to test it. Click the Move Now button given that you have already established your QuickBooks Online business.

Choose Yes or No to Indicate Your Intention to Import Inventory Into QuickBooks Online
In the event that you already keep tabs on inventory, QuickBooks will inquire as to whether or not you would like to import that inventory into QuickBooks Online. If you respond with an affirmative answer to this question, the quantity of your inventory will be adjusted in QuickBooks Online using the first-in, first-out (FIFO) inventory technique, beginning with the start date that you have specified. If you're not sure whether or not you want to import your inventory, select "no" from the drop-down menu. Afterward, you will have the option to import your inventory from a spreadsheet created in Excel.
Hint: If you switch your inventory method from FIFO to average cost, let the IRS know about the change. Because of this, before transferring your inventory to QuickBooks Online, we strongly advise that you speak with a tax specialist. Contact PNATC, we can help.
When you've decided whether or not you wish to import inventory to QuickBooks Online, the program will next inquire as to whether or not you already have an account with QuickBooks Online. Due to the fact that you have previously created a QuickBooks Online account, you should select the option Yes, sign me in:

After clicking Yes, sign me in, a page prompting you to log in to your QuickBooks Online account will display on your QuickBooks Desktop account.
There will be a notification asking you to authenticate your identity whenever you use QuickBooks Desktop to login in to your QuickBooks Online account. First, check your email or phone for the code, and then input it to continue:
In QuickBooks Online, Click on Your Business.

After you log in to your QuickBooks Account, select QuickBooks Online company from the drop-down list that's most appropriate for the data to be imported. In the event you have more than one company, you'll want to be very careful when choosing which one to convert, as doing so will overwrite any data that was previously stored. You have the option of saving it for an already established company, or you can make a brand-new company instead.
Create a copy of the QuickBooks Data File.
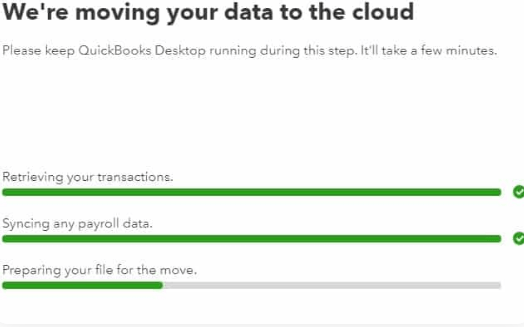
After you've chosen your business, QuickBooks will take a few moments to process the information, and then it will present you with a confirmation page that looks something like this:
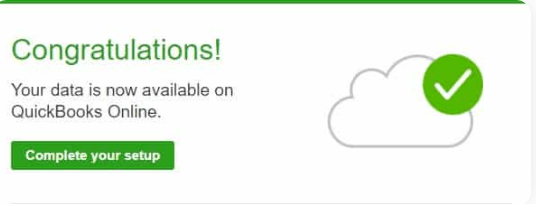
QuickBooks will send you an email when your QuickBooks Online business is available for use; however, if your file is very big, this may take several hours. Click on the Complete your setup button as soon as you receive an email that is comparable to the one that is provided below. This will allow you to log in to QuickBooks Online and examine your data:
Hint: It is only essential to export lists from QuickBooks Desktop and import them into QuickBooks Online if you were unable to convert your Desktop file utilizing the methods that are previously stated. This might take place, for example, if you have more than 350K targets or if the file on your desktop is corrupted. In the event that your QuickBooks conversion was successful, your work here is over.
Rather than converting a QuickBooks Desktop file, list data can be sent instead.
You can avoid having to convert your Desktop file to an Online business by instead exporting critical listings from your QuickBooks Desktop company and importing them into your QuickBooks Online company. This is one solution. Your chart of accounts, as well as your customers and vendors, goods, and services, will all be transferred as a result of this. On the other hand, you won't be able to transfer previous transactions using this method; as a result, you'll have to input initial balances.
There are two steps involved in the process of transferring lists from QuickBooks Desktop to QuickBooks Online. First, create a spreadsheet in Excel using the listings that were exported from Desktop. Second, within your QuickBooks Online business, import the spreadsheet that was created in Excel.
Exporting Lists From the QuickBooks Desktop
You may save hours of time entering data in your new QuickBooks Online firm by exporting the following lists from QuickBooks Desktop to Excel:
- Chart of accounts
- Customers
- Vendors
- Products and services
Hint: QuickBooks Online will only import the first worksheet of an Excel workbook when it is being used to import a workbook. When you have finished exporting Excel workbooks from QuickBooks Desktop, check that your data is placed in the first worksheet, the tab located at the bottom of the Excel screen. Schedule a Free Consultation if you need help.
Exporting the Chart of Accounts From QuickBooks Desktop
Proceed to your chart of accounts by selecting Chart of Accounts: from the top menu bar after clicking on Company, which will take you to the appropriate page.

You may view a list of your accounts by selecting Account Listing from the drop-down menu that appears when you click on Reports at the bottom of the page.

You may export the Account Listing report as an Excel spreadsheet by selecting Excel, then clicking the Create New File button, and then following the on-screen directions to save the worksheet to your local computer:

You may now consider the process of exporting your chart of accounts to an Excel file to be complete. Make a note of the location where the spreadsheet was stored so that you may import it into QuickBooks Online at a later time.
Exporting Customers From QuickBooks Desktop
You may access the Customer Center by choosing Customers from the top menu bar, and then clicking on the Customer Center link that appears.

Select Excel from the menu bar at the top of the Customer Center, and then click on the Export Customer List button:

To ensure that the newly created worksheet can be imported into your QuickBooks Online business at a later time, be sure to save it on your computer by following the on-screen directions.
Exporting Vendors From QuickBooks Desktop
To go to the Vendor Center, go to the top menu bar and click on Vendors. Then, pick Vendor Center from the drop-down menu that appears.

Excel and Export Vendor List may be accessed from the Vendor Center by clicking the corresponding buttons on the upper toolbar:

To save the worksheet so that it can be imported into QuickBooks Online at a later time, follow the instructions that appear on the screen.
The Process of Exporting Goods and Services Using QuickBooks Desktop
To access the Item List screen, pick Customers from the main menu at the top of the page, and then click on the Item List button:

Click on Excel at the bottom of the screen that displays the item lists, and then select Export All Items:

Save the items into an Excel spreadsheet by following the instructions that appear on the screen.
Due to the fact that additional item categories are associated with processes that are slightly different between QuickBooks Desktop and Online versions of QuickBooks, only the Inventory Part, Non-inventory Part, and Service item types will be able to be imported. Launch Excel and navigate to the worksheet you produced in the previous step. From there, remove any line entries for items other than the three that will be imported into QuickBooks Online.
You may make removing lines in your Excel worksheet go much more quickly if you sort the worksheet by the Type column. This will group your things according to their respective types.
How to Import Lists Into Your Online QuickBooks Account
There is step-by-step online training available that will assist you in becoming proficient in the usage of QuickBooks Online for the management of your company. In the following three courses, you will learn how to import the spreadsheets that you produced in the previous lesson, as well as how to manually input things into your QuickBooks Online business:
- How to set up products and services
- How to set up customers
- How to set up vendors
Making the Transition from QuickBooks Desktop to Online FAQ's
When you go from QuickBooks Desktop to QuickBooks Online, what information does not get imported?
When you migrate from QuickBooks Desktop to QuickBooks Online, the majority of your data will be imported; however, there are a few elements that will not convert, including the following:
- QuickBooks Online comes with a wide selection of reports that may be used to replace many of the ones you've been employing in the desktop version of the software. The most effective course of action is to search for and start utilizing a new report in QuickBooks Online.
- Charges that are made on a regular basis using a credit card: You will need to access the Merchant Center in order to cancel any existing transactions that are made using a recurring credit card. After that step is finished, you will need to recreate them in QuickBooks Online by establishing recurring sales receipts.
- A copy of your desktop version and the data it contains is all that can be done about your audit trail from the past. However, moving ahead with QuickBooks Online, you'll have a more robust audit trail.
- After converting to QuickBooks Online, you will need to begin your account reconciliations from the point at which you left off with them previously. This applies to both bank and credit card accounts. If you require access to previous reconciliation reports, you can still acquire them from your desktop version as long as you haven't deleted the files containing those reports first.
- You are unable to transfer your inventory from a Mac computer; but, if you have access to a computer that runs Windows, you are able to make the transfer there. If you use QuickBooks for Mac, you can accomplish this.
Leave a Reply
Contact PNATC
Contact - Website lead
Recent Posts


Share Post
Contact PNATC
Get all your questions answered and problems solved with our QuickBooks experts today!