
Import Excel to QuickBooks with the Experts at PNATC
Excel to QuickBooks
Convert Excel spreadsheet to QuickBooks. The team of QuickBooks ProAdvisors at PNATC, are experts in data conversion and help you convert your accounting data in your excel spreadsheet to QuickBooks. Contact us today.
PNATC Can Import Your Excel to QuickBooks
How to Import Your Data from Excel to QuickBooks
Both the desktop version and the online version of QuickBooks are accessible. With an annual subscription, QuickBooks Desktop is an On-Premises solution that comes in 3 editions and offers capabilities ideal for companies of all sizes. Monthly subscription-based QuickBooks Online is a cloud-only version that costs money. Let's now go into greater depth on how to import data from Excel into QuickBooks Desktop and QuickBooks Online.
Import Data from Excel to QuickBooks Desktop
To connect Excel to QuickBooks Desktop and import your Excel Data, there are 3 options:
- Excel to QuickBooks Standard
- Excel to QuickBooks Advanced
- Excel to QuickBooks - Lists
Excel to QuickBooks Standard Import
You can review the fields that will be imported, those that are optional, and any constraints before importing your Excel file. Using the Standard importing option, you can import Customers, Vendors, and Products you sell in QuickBooks. To carry out the Standard Import, adhere to the straightforward instructions below:
- Step 1: At the top navigate to File > Utilities > Import Data > Excel Files. If an Add/Edit Multiple Lists Window pops up, then click on the No button.
- Step 2: Follow The Importing Wizard. A) Decide which data type you want. A prepared Excel Spreadsheet is now opened by QuickBooks, where you can paste your Excel data and save it. The Add My Data Now option will now appear once you close the file. You can now evaluate the outcomes and, when finished, select the Close option.
You can also import the Chart of Accounts using the Standard Import by
- Backing up your company file before importing.
- Selecting the Chart of Accounts item under the Lists menu.
- Choose the Import from Excel option under the Account drop-down menu.
- Select the Excel file you wish to import.
- Select the desired sheet from the Excel file.
- Map the column headers and attributes in your Excel file to those in QuickBooks in order to import the data properly.
- Give the mapping a name.
- Choose
Account as the import type.
- You may now manually align the QuickBooks column heads with Excel and save your work by clicking the Save button.
- To confirm the import procedure, click the Import option and then choose
Yes.
Excel to QuickBooks Advanced Import
To import Excel into QuickBooks, there is an Advanced Importing technique available.
Step 1: Select Excel Files under File > Utilities > Import Data. Click the No button if an Add/Edit Multiple Lists Window appears.
Step 2: Click on the Advanced Import Option.
Step 3: Mapping setup. Choose the Excel file to import by clicking browse and select the desired sheet from the Excel file by clicking on the Open option. Be sure to make sure the This Data File Has Header Rows checked is selected. Select the Add New option under the Choose the Mapping drop-down menu.
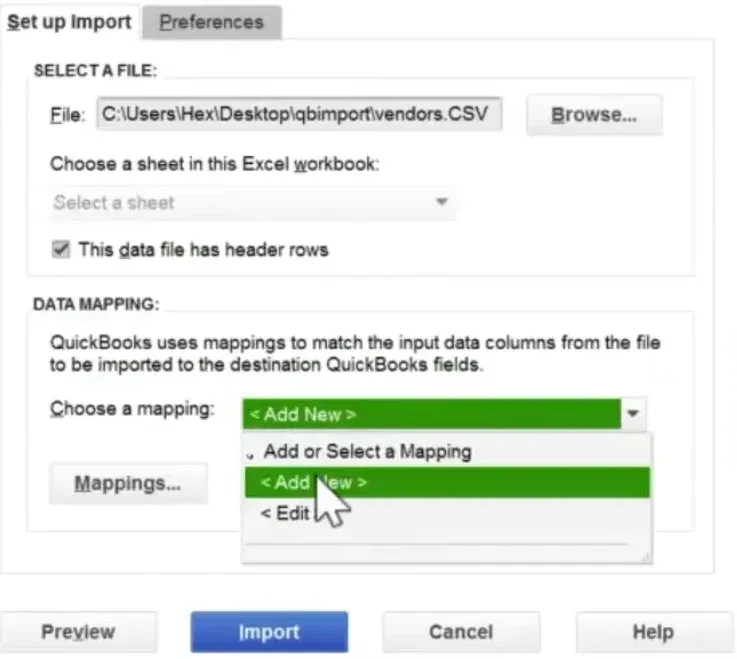
Step 5: Mapping setup (examples: customers, vendors, etc.)
Step 6: From the Import Type drop-down option, choose the data type you are importing.
Step 7: Review and compare the columns for QuickBooks and Import Data.
Step 8: Click Import once you've checked the mapping by clicking Preview.
Excel to QuickBooks - Multiple Lists Import
- Go to Lists > Add/Edit Multiple List Entries
- Choose the list you wish to work with from the List
- Filter the list to locate a particular entry.
- Select which columns should show up in the Add/Edit Multiple List Entries Window by clicking on the Customize Columns option. The Default button will return you to the pre-selected columns.
- Select the column you want to add from the left pane, then click the Add button.
- Select a column in the right pane and choose the Remove option to remove it.
- By selecting the column, choosing Move Up or Move Down, and then clicking on the desired position, you can change the order of the columns then click
OK
- By selecting the necessary fields, you can now copy the data from Excel files and paste it into QuickBooks.
- To save your changes, click Save Changes.
Have Several Excel Sheets you'd like to import to QuickBooks? Contact the QuickBooks Experts at PNATC, we can help.
Import Data from Excel to QuickBooks Online
When it comes to importing data from Excel to QuickBooks, QuickBooks Online provides a straightforward and clear method.
First, navigate to the top right corner of the screen where there is an icon labeled Settings. From there, select the Import Data option.
Second, You will see a list of available data type selections, including Bank Data, Customers, Suppliers, Products and Services, Chart of Accounts, and Invoices and Bills. In this demonstration, the Bills option is chosen in order to demonstrate how to import bills from Excel files. Make sure that the Excel file is correctly formatted in accordance with QuickBooks Online and that it has each of the following columns before you attempt to import the file.
- Account
- Bill Date
- Bill no.
- Due Date
- Line Amount
- Line Tax Code
- Supplier
Third, Choose your Excel file
Fourth, Select the Open > then select Next.
Fifth, Map your column headings correctly.
Sixth, Now importing your data, select Import Data. Once the import summary has been displayed and the procedure has been successfully completed, select Done and Ok.
QuickBooks Work Flow
Import Excel To QuickBooks - Data Conversion Service
It can be intimidating to convert your accounting system. There may be a lot of data, depending on how long you've been in business, and Excel and QuickBooks are not a perfect match. You will have a QuickBooks conversion specialist working with PNATC who will examine your unique scenario, identify the QuickBooks items you'll require, and collaborate with you to create a phased conversion plan. Additionally, we have full-time programmers for QuickBooks who will handle the export, cleaning, and import of your historical data. Following the conversion, your team will receive thorough training on the new system, and we'll assist you in setting up productive procedures that let you make the most of your new system.
Step 1 - Needs Assessment
First, access the company file that you need to export to QuickBooks Online by logging in to QuickBooks Desktop with the administrator account.
Step 2 - QuickBooks File Setup
If you are using Desktop Pro or Premier, you will need to navigate to the Company menu and then click the Export Company File to QuickBooks Online option. In order to access Desktop Enterprise, you will need to enter Ctrl+1, then Ctrl+B+Q.
Step 3 - QuickBooks Training
To switch over to the new software, training the staff is essential. To ensure your team is knowledgeable, we'll conduct training. PNATC is well-known for its training; we assist all of our clients with training and offer instructional videos. Even if they are not our clients, we want every QuickBooks user we assist to succeed.
Step 4 - Review The Books
We will determine whether you require more information or monthly reports in order to operate your firm. We'll thoroughly check to make sure we've imported everything you need because frequently we don't know which information is crucial until we no longer have access. We'll transfer any more files from your previous system to QuickBooks if they need to be migrated.
Step 5 - System Maintenance
We'll give you some time to use QuickBooks before checking in to see how things are. We'll strive to stop any problems before they start. Additionally, we'll retrieve any features or data that were left. In order to keep you on track, we also recommend continuing monthly/quarterly closing services. Our aim is to ensure you use QuickBooks to its full potential.
We've done thousands of QuickBooks Data Conversions, helping our clients convert to QuickBooks
- Convert Accountedge to QuickBooks
- Convert Accounting Seed to QuickBooks
- Convert Accpac to QuickBooks
- Convert Acumatica to QuickBooks
- Convert Adagio to QuickBooks
- Convert ART to QuickBooks
- Convert Business Works to QuickBooks
- Convert Cougar Mountain to QuickBooks
- Convert DacEasy to QuickBooks
- Convert Deskera Books
- Convert Epicor to QuickBooks
- Convert Exact Macola to QuickBooks
- Convert Excel to QuickBooks
- Convert Flexifinancials to QuickBooks
- Convert FinancialForce to QuickBooks
- Convert Foundation to QuickBooks
- Convert FreshBooks to QuickBooks
- Convert Great Plains to QuickBooks
- Convert Infor to QuickBooks
- Convert Intacct to QuickBooks
- Convert MAS 90 to QuickBooks
- Convert MAS 200 to QuickBooks
- Convert MAS 500 to QuickBooks
- Convert Master Builder to QuickBooks
- Convert Maxwell to QuickBooks
- Convert Microsoft Access to QuickBooks
- Convert MS Dynamics to QuickBooks
- Convert MyBooks to QuickBooks
- Convert MYOB to QuickBooks
- Convert Navision to QuickBooks
- Convert NetSuite to QuickBooks
- Convert Oracle to QuickBooks
- Convert Patriot Accounting to QuickBooks
- Convert Peachtree to QuickBooks
- Convert QuickBooks Desktop to Online
- Convert QuickBooks Online to Desktop
- Convert QuickBooks Pro to Enterprise
- Convert QuickBooks Premier to Enterprise
- Convert Sage 50 to QuickBooks
- Convert Sage 100 to QuickBooks
- Convert Sage 200 to QuickBooks
- Convert Sage 300 to QuickBooks
- Convert SAP to QuickBooks
- Convert Simply Accounting to QuickBooks
- Convert Spire to QuickBooks
- Convert Synder to QuickBooks
- Convert Timberline to QuickBooks
- Convert Traverse to QuickBooks
- Convert Wave to QuickBooks
- Convert Xero to QuickBooks
- Convert ZarMoney to QuickBooks
- Convert Zoho Books to QuickBooks
Hire an Expert for Conversion - Book a Free Consultation with PNATC
Converting from Excel to QuickBooks requires the assistance of a professional for a variety of reasons.


